![fourvenues.LOGO.blanco.png]](https://base-conocimientos.fourvenues.com/hs-fs/hubfs/fourvenues.LOGO.blanco.png?height=40&name=fourvenues.LOGO.blanco.png)
Before You Begin
ℹ️ Who can do this?
Profiles with the following permissions:
- Administrators
- Sales channel management
Step by Step
1. Access the Users Section
- Log in to Fourvenues PRO.
- Go to Settings and select the Users tab.
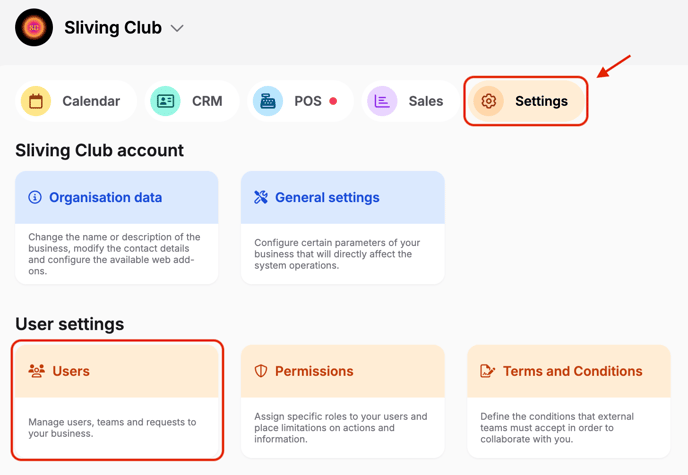
- Here, you’ll see a list of existing users and groups. By default, your organization will have two groups already created: Directors and Public Relations.
2. Create a Group
- Click on the "New" button and select "New Group".
- A popup will appear where you need to enter the group’s name and confirm.
- The group will be created and will automatically appear in the top navigation bar.
3. Customize the Group
- Click on the name of the newly created group from the top navigation bar.
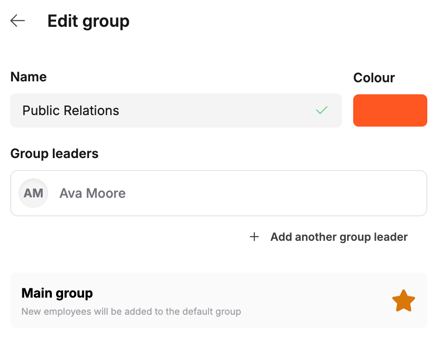
- Select the "Edit Group" option and make the necessary configurations. From here, you can:
- Change the group’s name.
- Assign a distinct color for easy identification.
- Designate a group leader.
- Set the group as the default group, so any new user added to your organization is automatically assigned to it.
4. Assign Users to the Group
- From the top navigation bar, select the Users tab.
- Search for the user you want to assign, then click on their name.
- Select the group(s) they should be part of and click Save.
🚨 Keep in mind that being part of a group (e.g., Directors) does not automatically grant permissions to the user. To assign permissions, go to Settings > Permissions.
👥 Need Help or Have Questions? If you need more information, feel free to contact us at help@fourvenues.com, letting us know how we can assist you.