![fourvenues.LOGO.blanco.png]](https://base-conocimientos.fourvenues.com/hs-fs/hubfs/fourvenues.LOGO.blanco.png?height=40&name=fourvenues.LOGO.blanco.png)
Before you start
ℹ️ Who can do this
Only users with Admin and Event Management permissions can create and configure zones.
👉 To create a zone, it’s recommended to have at least one rate already set up. You can check how to do that here.
Step by step
1. Go to Settings > Zones
From here you can manage all zones and rates that apply to your events.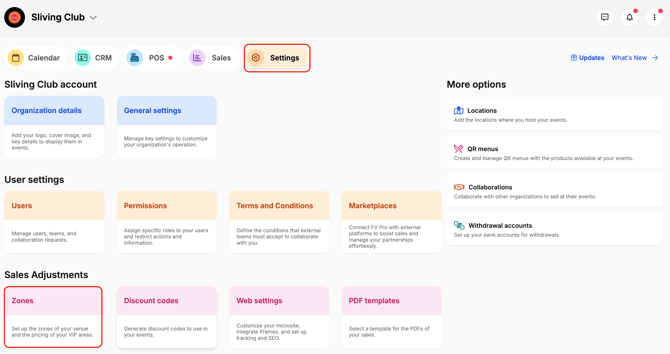
2. Click Create zone
-
Name: give the zone a name and click Create.
-
Zone map: upload an image of the specific zone. Make sure the map is properly scaled so you can place the spaces later.
3. Assign rates to the zone
Go to the Rates tab and toggle on the ones you want to apply to this zone.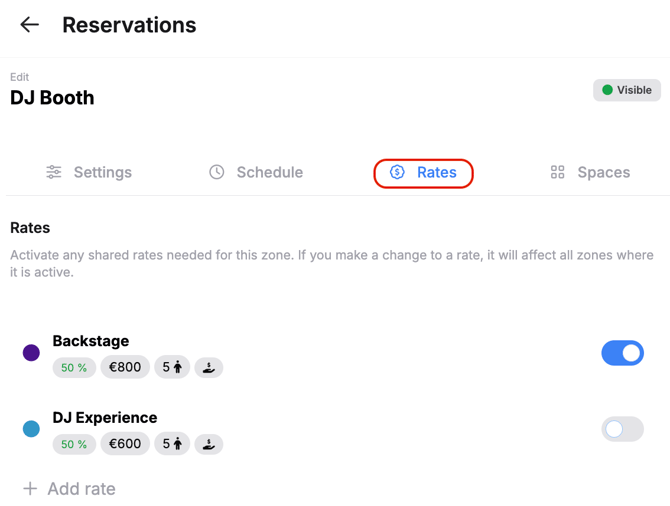
-
You can use existing rates or edit & create new ones directly from this menu.
-
⚠️ Remember: rates are shared between zones. If you edit a rate, it will update in all zones where it’s assigned.
4. Add spaces to the zone
Go to the Spaces tab > Add spaces. 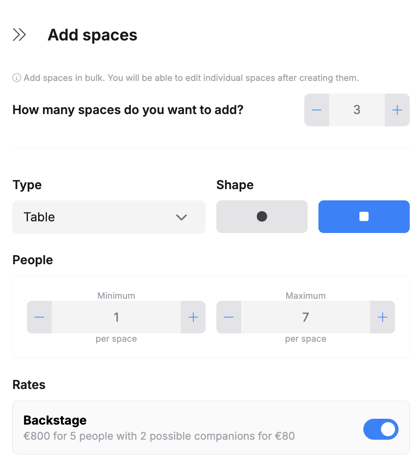 Here you can:
-
Create multiple spaces at once.
-
Define the type of space (tables, sofas, daybeds, etc.).
-
Set min and max capacity for each space.
⚠️ Keep in mind: the maximum number of guests set in the rate should match the maximum capacity of the space. -
Assign the corresponding rate.
Click Add spaces, place them on the map, and adjust their position with the visual editor.
5. Configure zone settings
From the Settings tab you can customize:
-
Who can book and/or select spaces:
-
Customers → through the reservation microsite.
-
Professional users → your internal team, managing bookings from Fourvenues PRO.
-
External collaborators (promoters from other orgs) → professionals from partner businesses with active collaborations.
-
-
Auto-acceptance: reservations with a deposit are always auto-accepted. From here you can also enable auto-acceptance for reservations without a deposit.
-
Mark zone as full: define when a zone should be considered full.
-
Customer view: choose how the zone is displayed to clients, either as a map, as a list of spaces, or both.
-
Promotional image: upload a featured image for the zone, shown in the microsite (note: if you select the map view, the map will take priority over the image).
6. Save your changes
Once saved, your zone will be ready to use in reservation sales.
Tips
-
If you have several zones with the same layout, use the Duplicate function to save time.
-
⚠️ Heads up: rates are shared. If you duplicate a zone and reuse the same rate, any price changes will also apply to the original zone. Create new rates if you need different pricing.
-
-
Keep your dashboard clean by deleting zones you don’t use.
Need help?
👥 Contact us via the PRO chat or write to help@fourvenues.com.