![fourvenues.LOGO.blanco.png]](https://base-conocimientos.fourvenues.com/hs-fs/hubfs/fourvenues.LOGO.blanco.png?height=40&name=fourvenues.LOGO.blanco.png)
Before you start
ℹ️ This configuration is only available to Administrators or users with Marketing and CRM permissions.
Step by step
1. Access the Marketing Campaigns section
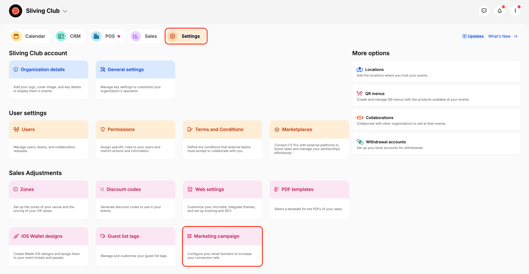
From your organization’s General Settings, go to the Marketing Campaigns section and click Verify domain to get started.
2. Add your domain
Enter your domain and click Add.
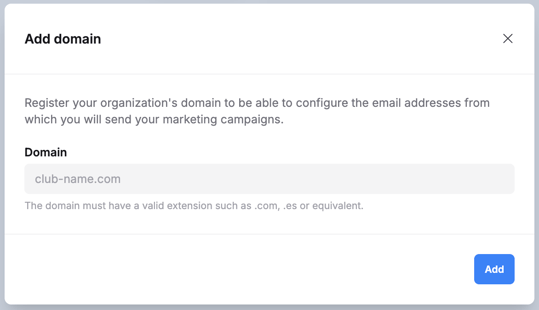
⚠️ The domain must be in a valid format, for example: yourvenue.com.
If you don’t have your own domain, you can always use our generic email option: @fourvenues-mkt.com.
However, sending campaigns from your verified email increases the chances of reaching your clients’ primary inbox.
3. Add the DNS records in your domain provider
Once the domain is added, a second step will appear showing 3 DNS records.
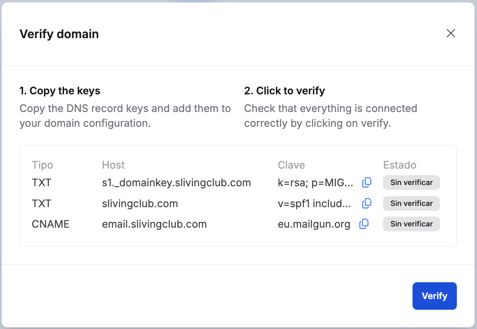
Copy each one and paste it into the DNS settings of your domain (this is done from your domain provider’s dashboard).
After you’ve added them, return to this screen and click Verify in the lower-right corner.
Once properly configured, each record will change its status to Verified.
🔑 Tip: For detailed help inserting DNS records, see this article: �� Connect your domain to Fourvenues
4. Add sender emails
Once your domain is verified, you can add up to 5 email addresses that will be used to send your campaigns.
-
Choose emails that match your verified domain (e.g.
hello@yourvenue.com). -
You can delete any email by clicking the “X” next to it.
💡 The email addresses you use can be real or made up.
If you choose to use addresses that don’t actually exist, we recommend using a format like no-reply@yourvenue.com for clarity and consistency.
5. Confirmation and usage in campaigns
After your emails have been added and confirmed:
-
You’ll see a success message.
-
The emails will appear in a table within the verification section.
-
When creating a new campaign, you’ll be able to select one of these emails as the sender.
All set!
It’s also possible to delete verified domains or emails:
🗑 How to delete verified domains or emails
From the same configuration section:
-
Select one or more verified domains.
-
Click Delete and confirm in the popup modal.
-
You can also delete emails individually.
👥 If you need further assistance, feel free to contact us at help@fourvenues.com and let us know how we can assist you.
💡 The email addresses you use can be real or made up.
If you choose to use addresses that don’t actually exist, we recommend using a format like no-reply@yourvenue.com for clarity and consistency.